Etiam pulvinar consectetur dolor sed malesuada. Ut convallis
euismod dolor nec pretium. Nunc ut tristique massa.
Nam sodales mi vitae dolor ullamcorper et vulputate enim accumsan.
Morbi orci magna, tincidunt vitae molestie nec, molestie at mi. Nulla nulla lorem,
suscipit in posuere in, interdum non magna.
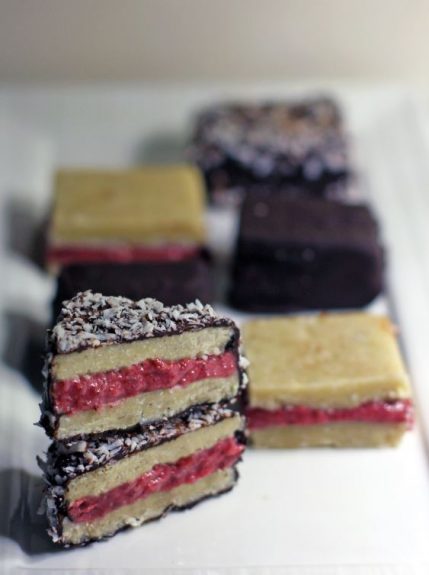
Lamingtons are almost an Australian institution and have long been associated with Australia Day. They come in all shapes and sizes from traditional slab cakes covered in chocolate and coconut to a lamington smoothie!?!
I gave this recipe “The Healthy Spin” and came up with something slightly alternative (truly – they are a far cry from the real thing but just as tasty!) and a little bit of a fun take on the traditional cousins.
Preparation Time 23 minutes + setting time Cooking time 2 minutes Makes approx. 12 lamingtons Ingredients Total Preparation Time 25 minutes + setting time
You will need Slice tin (approx. 30x20cm) lined with non-stick paper Spatula
Ingredients Base 40-60g maple syrup (or sweetener of choice) 100g blanched almonds or macadamia nuts 100g raw cashew nuts 120g shredded coconut 70g coconut oil 2 tsp vanilla bean paste or extract 70g chia seeds
Coating 100g dark chocolate, roughly chopped Extra shredded coconut
Preparation 1. If using Erythritol or similar, mill with MC on / 10 secs / Speed 9. Scrape down. Otherwise skip this step. 2. Scrape down and mix ingredients with spatula, blend with MC on / 20 secs / Speed 8 or until mixture holds together when a small amount is squeezed in your hand. 3. Divide the mixture in half. With damp hands, place half into lined tin and press down firmly. It should be approx. ½-1cm in height when finished. Freeze for up to 20 mins or until firm. 4. Remove base from tray, keeping it on the paper and place onto a chopping board. Cut base in half (it doesn’t matter if you cut the length or width), set half aside. Spread enough Strawberry Chia Jam on one half to make a thick filling. Spread evenly and place set aside half of the base on top. Gently press down to secure in place without squeezing filling out. Place onto the paper and (using the paper), carefully pick up the completed lamington and place back into tray to hold in place. Freeze for a further 20 minutes or until set together. 5. Once set, prepare coating. Add dark chocolate to mixing bowl, mill for 10 sec/speed 9/MC on. Scrape down and melt with MC on / 2 mins / 60°C/ Speed 2. 6. Pour chocolate into a bowl and extra shredded coconut into a separate bowl. 7. Remove slice from freezer and cut into bite size lamingtons. One at a time, coat with chocolate, then coconut. Place each one onto tray and refrigerate until needed. These can also be frozen. Remove from freezer 10 minutes before serving to allow to thaw slightly.
My tips * You can also make this mixture into bliss balls. Pipe small balls of Strawberry Chia Jam onto a tray lined with non-stick paper and freeze until firm. Then wrap each jam ball in the base mixture and coat each bliss ball with chocolate and coconut. * You can use any combination of the nuts mentioned. You may need to mill the mixture a little less if you use all macadamia and cashew nuts as they are softer.
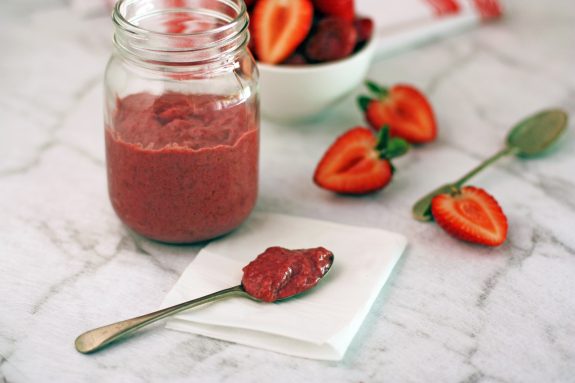
Strawberry season signifies summer for me. The beautiful rich red colour, sweet smell and amazing flavour of a ripe berry makes me want to use them in as many ways as possible. Making jam is not only a great way to preserve them to use later but also a fabulous way to use up slightly over ripe fruit. This “healthy spin” on jam means it has less sugar and is bursting with strawberry flavour.
Ingredients 30g (2 tablespoons) chia seeds 250g fresh strawberries, washed and leaves removed 1 teaspoon vanilla extract or paste 25g maple syrup (or sweetener of your choice)
Preparation 1. Add chia seeds to mixing bowl, mill with MC on / 30 secs / Speed 10. Scrape down. Add strawberries and vanilla, chop with MC on / 20 secs / Speed 4. Scrape down, cook with MC on / 7 mins / 100°C / Speed 2. 2. Add maple syrup and mix with MC on / 10 secs / Speed 3 or until incorporated. 3. Pour mixture into sterilised jar and store in fridge until needed.
DOUBLING THIS RECIPE: You can double this recipe easily. You may need to cook it for a minute longer to get the consistency you want.
My tips * Using black chia seeds will get a very firm jam consistency once set while white chia seeds don’t swell up quite as much and the jam will be a softer set. I used white seeds. * This will keep in a sealed jar in the fridge for up to a month. * Use this as a filling in Raw Lamingtons.
Summer is here! It seems that we’ve had lots of warm weather all over Australia recently. I love this time of year because of the wonderful produce that is available to us all. One of those special treats for me is mango. I don’t eat a lot of them because of the sugar content, even though it is a natural sugar if I’m sticking to a keto way of life I tend to avoid it. However, for those of us who just want to eat Healthy, there are many reasons why you should include this delicious fruit. Mango flesh is rich in pre-biotic dietary fiber, vitamins, minerals, and poly-phenolic flavonoid antioxidant compounds. It is an excellent source of potassium, vitamin A, vitamin C and vitamin B6. Even better is that they taste great.
This recipe was given to me by my dear friend, Elisabeth Higgins. Of course, I had to put my own “Healthy Spin” on it but thank her for her generosity in sharing.
Ingredients Pudding
20-30g (5-6cm piece) of peeled fresh ginger (more or less depending how much you like ginger
500-600g mango flesh (2 large or 3 smaller ripe mangos), diced
200g coconut cream
200g water
Zest of 1 lime
Juice of 2 limes
70g chia seeds
Decorations
Toasted coconut flakes
Pistachios or other nuts or seeds
Fresh fruit: diced mango, raspberries, blueberries
Preparation
1. Add ginger to the mixing bowl and chop with MC on / 5 secs / Speed 9. Scrape down. Repeat if necessary until finely chopped.
2. Add mango, coconut cream, water, lime zest and lime juice. Blend with MC on / 30 secs / Speed 8. Scrape down, blend again with MC on / 30 secs / Speed 8 or until very smooth.
3. Add chia seeds and mix with MC on / 20 secs / Speed 3 or until incorporated.
4. Pour mixture into serving bowls, leaving space from the top for your decorations. Use clear bowls/jars for extra effect.
5. Preferably chill overnight or at least for 4 hours in the fridge.
6. Decorate just before serving.
DOUBLING THIS RECIPE: You can double this recipe easily. You may need to assist the final mixing step by using the spatula through the hole in the mixing bowl lid to make sure everything is combined.
My tips
* Using black chia seeds will result in a firm pudding consistency once set while white chia seeds don’t swell up quite as much and the puddings will be a softer set. I used 50/50 black and white seeds. Either choice will not alter the flavour.
* Keep these covered in the fridge for up to 4 days. Great for preparing ahead as a “grab and go” meal.
* Use anything you like to garnish.
* You can substitute the coconut cream and the water for a total of 400g coconut milk.
* For a Low Carb option, substitute the mango for raspberries.
* You can use frozen fruit, just add it to the mixing bowl with the ginger in step 1 then continue with the recipe.
ease: 9.5/10. Could it be any easier?!
total prep time: 15 minutes + chilling and decorating time total: 15 minutes + chilling and decorating time
taste: 10/10 These were a hit for our “first week back” in the new year and will be for a while to come.
would I make it again: Yes!!!!! with different flavours and even my Low carb version.
I have always said “when life gives you lemons……..make something you love to eat”. 🙂
There are many things that I love to make with lemons and one of my absolute favourites is lemon curd. My pre-healthy life saw me make this recipe which (at the time) I absolutely loved. For me it is about using something that is abundantly in season and at it’s most delicious to create something wonderful.
With this particular recipe, I love making mini tarts or just eating it out of the jar. I hope you have some lemons to be able to make this soon.
(paleo) Lemon Curd
No: Gluten / Grain / Soy / Dairy / Nuts / Refined sugar
Makes approximately 2 cups
You will need Spatula Jar for storage Zester
Ingredients Zest of 2 organic lemons, approx. 1 Tbsp / 10g
3 large eggs, 150-160g when cracked into the mixing bowl
125g (½ cup) freshly squeezed lemon juice (3-4 lemons)
100g (3 Tbsp) honey 125g coconut oil OR ghee OR (1 stick/4 ozs) unsalted butter, cut into pieces
Preparation Place all ingredients into mixing bowl, cook with MC off/ 8 minutes / 90°C / Speed 3.
Pour into 2 hot washed/sterilised jars with twist-off lids and close immediately. Cool completely before storing in the fridge.
My tips * I used Meyer lemons which gave this a fantastic yellow colour. *If you want a little more yellow colour you can add a pinch of turmeric to the mixing bowl when cooking the curd. If you want to intensify the lemon flavour you can add 1 or 2 drops of pure lemon oil which you can purchase here. Add the oil after the curd is cooked and just stir it through.
* I used sterilised jars to ensure these would keep as long as possible. You can double, triple, even quadruple this recipe to make a large batch. Just extend the cooking time by 1½ – 3 minutes.
* I love to make mini tart cases and fill them with lemon curd for a quick dessert.
* This will keep in the fridge for several weeks (if you don’t eat it all).
* If you find the curd is spitting out the top during the cooking process you can sit the simmering basket on top of the lid.
* If you’d like to know more about the pure essential oils I use, please take a look here.
ease: 9.5/10. Could it be any easier?! total prep time: 10 minutes + chilling time
total cooking time: 8 minutes total: 18 minutes + chilling time
taste: 8.5/10 – This was a well balanced curd with a tangy lemon flavour. The consistency was lovely and thick just like my traditional version.
would I make it again:Absolutely. When the season brings you lemons, make lemon curd!
I originally wanted to make something with an Anzac spin on it. I thought of some kind of “Anzac Bar” so that they could be easily consumed with your favourite brew after attending a dawn service. As I was making them I thought “don’t mess with the original”. Sometimes traditions are just meant to stay the same.
The other problem is that these are simply too easy and delicious to only make once a year. Great as a grab-and-go, pick-me-up or “fat bomb” style filler when you’re feeling peckish.
The hardest part is waiting for these to chill enough to be firm because you just want to eat them!
(paleo) No-bake bars
No: Gluten / Grain / Soy / Dairy / Eggs / Refined sugar
Makes approximately 12 – 14 mini bars
You will need Spatula Silicone bar mold or slice tray lined with non-stick baking paper
Ingredients 40g raw macadamia nuts or blanched almonds 130g blanched almonds 100g desiccated coconut pinch finely ground salt 20g coconut oil, melted 30-50g honey (I used 30g) – For vegan option, use sweetener of choice
Optional additions (I did two different versions)
1 Tablespoon dried cranberries
1 Tablespoon slivered almonds
1 Tablespoon toasted shredded coconut
Preparation Place 40g of nuts into mixing bowl, chop for 3 – 5 seconds / Speed 5, until nuts are roughly chopped. Set aside.
Without washing mixing bowl, add blanched almonds and coconut and chop for 15 – 20 seconds /Speed 8, until mixture begins to come together. Scrape around sides of bowl and add salt, coconut oil, honey and reserved chopped nuts. Mix for 10-15 seconds / Reverse / Speed 4 or until mixture comes together. Scrape mixture into molds or tray and press down firmly. Top with your choice of optional additions then place into fridge for approximately 1 hour or until firm.
Remove from fridge, pop out of molds and wrap or simply eat them. Store remaining bars in an air tight container in fridge until ready to use.
My tips * Flavour these with an essential oil of your choice. Just add 1 drop.
* You can double, triple, even quadruple this recipe to make a large batch. If you don’t have molds, just line a baking tray or tin and press the mixture into that then top it with what whatever you like.
* If your coconut oil is hard, you can carefully run the jar under hot water for a minute or two until it is slightly melted.
*These will keep in the fridge for several weeks (if you don’t eat them all).
* If you want to chill them quickly you can put them into the freezer for 15 – 30 minutes or until firm.
* If you’d like to know more about the pure essential oils I use, please take a look here.
ease: 9.5/10. Could it be any easier?! total prep time: 10 minutes + chilling time
total cooking time: 0 minutes total: 10 minutes + chilling time
taste: 10/10 Even my not-quite-paleo man LOVED these and coconut is not his favourite food!
would I make it again: Ummmm, I already have because the first batch is all gone 🙂
Chocolate has always been one of my favourite things. However, over the years my tastes have changed slightly and more recently I have turned to the “dark side”, preferring nothing less than 70% cacao. That being said, I developed this recipe with others in mind also.
I have always loved giving edible gifts as that is how I show my affection for people. I tend to make something with a lot of love and hope that shows in the gifts that I give. These are so simple and quick to make with only a few ingredients you can whip them up at the last minute to take as a hostess gift, as a present or even for an after-dinner treat.
Make these for yourself or someone you love. Just do yourself a favour and find an excuse to make these soon!
(paleo) Super simple chocolate
No: Gluten / Grain / Soy / Nuts / Dairy / Eggs / Refined sugar
Makes approximately 24 mini chocolates
You will need
Spatula
2 x 12-hole silicone chocolate mold
Ingredients
60g raw cacao powder
120g coconut oil
60-100g honey (I used 60g)
Optional additions (I did two different versions)
1 Tablespoon dried cranberries
1 Tablespoon slivered almonds
Preparation
Place cacao powder, coconut oil and honey into mixing bowl, melt for 2 minutes / 70°C / Speed 2. Meanwhile, divide the cranberries and almonds evenly between 12 of the molds. Once mixture is melted and combined, pour approximately half on top of cranberries and almonds to fill each mold. Use spatula to press mixture in if necessary and smooth top.
With the remaining half, add peppermint oil to mixing bowl and mix for 5 seconds / Speed 2. Divide the mixture evenly between remaining 12 molds.
Place the molds onto a tray and tap the tray gently on the bench several times to ensure that any air bubbles are forced out. Smooth any chocolate that may have been disrupted and place tray into fridge for approximately 1 hour or until firm.
Remove from fridge, pop out of molds and gift wrap or eat. Store remaining chocolates in an air tight container in fridge until ready to use.
My tips
* Flavour these with whatever you like. Orange essential oil would be lovely also.
* You can double, triple, even quadruple this recipe to make a large batch. If you don’t have molds, just line a baking tray or tin and pour the mixture into that then top it with what whatever you like.
*These will keep in the fridge for several weeks (if you don’t eat them all)
* If you want to chill them quickly you can put them into the freezer for 15 – 30 minutes or until firm.
* If you’d like to know more about the pure essential oils I use, please take a look here.
ease: 9.5/10. Could it be any easier?! total prep time: 8 minutes + chilling time
total cooking time: 2 minutes total: 10 minutes + chilling time
taste: 10/10 I know this isn’t “real” chocolate, BUT it is better for you, super easy to make and delicious. I hope you make it for yourself.
would I make it again: Yes!!!!! As much as possible.
Developing recipes can often be a challenging experience, especially when you are trying to create things that are free of grains, gluten, dairy, refined sugar and on occasion eggs and nuts. With a list like that even I think – what else is there? However, there is so much we can do with a few basic alternatives.
This is one recipe that I’ve wanted to convert for a little while. I’ve always loved profiteroles, in fact I think they used to be my favourite dessert. Many years ago I was fortunate enough to be in a lovely restaurant in Paris experiencing all things French. The perfect end to a wonderful meal was profiteroles with warm chocolate sauce. I thought I’d died and gone to heaven. Crunchy pastry, silky smooth vanilla infused crème centre topped with warm, bitter dark chocolate sauce. Could anything be better!?!
Recreating something like that is hard enough without restricting the ingredients we can use but I’m really happy with all the individual parts of this dish as well as the end result when they are all combined.
Make this for yourself or someone you love. Just do yourself a favour and find an excuse to make these soon!
(paleo) Profiteroles filled with vanilla crème patisserie drizzled with chocolate sauce (recipe by Fiona at Food 4 Thought).
No: Gluten / Grain / Soy / Nuts / Dairy
Contains: Eggs
Makes 24 mini profiteroles
You will need
Oven
Spatula
Medium glass bowl
24-hole mini muffin tray, greased with coconut oil
Small serving jug
Cling wrap or similar
Cooling rack
Crème patisserie (pastry cream) – makes approximately 2 cups Ingredients
400g coconut milk
60-80g maple syrup
2 egg yolks
20-25g tapioca flour
Seeds of 1 vanilla pod OR 2 teaspoons vanilla extract
Preparation
Place all ingredients into mixing bowl, cook for 7 minutes / 90°C / Speed 4. Transfer into a bowl, place plastic wrap directly on surface of pastry cream to prevent a skin from forming, and allow to cool. Once bowl is cool to touch place into refrigerator to cool completely and thicken.
Make pastry rolls.
My tips
*You can store the remaining pastry cream in an air tight container in the refrigerator for up to 2 days.
Preparation
Preheat oven to 200°C (fan-forced). Grease 24-hole mini muffin tray with coconut oil. Set aside for filling later.
Place all ingredients into mixing bowl, mix for 25 seconds / Speed 7. Scrape around sides of mixing bowl and mix for 5 seconds / Speed 7.
Fill each mini muffin mould three-quarters full with batter. Bake for 16 – 19 minutes (200°C fan-forced), or until puffy and lightly golden brown.
Remove from oven and carefully remove tray onto a cooling rack. Once cool enough to handle, use a skewer to pierce the base of the roll to allow any remaining steam to escape. This will keep them crisper as they cool. Set aside to cool completely before filling.
My tips
*These are best consumed on the day they are made, however you can store the remaining rolls in a container for up to 2 days.
Chocolate sauce – makes approximately 1 cup – *Make this close to serving Ingredients
50g dairy free 100% chocolate pieces
20g raw cacao powder
50g maple syrup or honey
150g coconut milk
Pinch of fine salt
Preparation
Place chocolate into mixing bowl and melt for 2 minutes / 70°C/ Speed soft.
Add remaining ingredients and mix for 15 seconds / Speed 3. Scrape around sides of mixing bowl and heat for 1 minutes / 70°C/ Speed soft. Scrape into jug or serving dish. Serve warm.
My tips
*This sauce will store in an air tight container in the refrigerator for up to a week. You will need to heat it gently to serve as it will firm up in the refrigerator.
ASSEMBLY
If you haven’t already made the chocolate sauce do so now.
Remove crème patisserie from refrigerator and remove plastic wrap. You have two options of filling the pastry rolls. You can lay each one on their side and cut them so you have a top and bottom, like a bun OR you can make the hole in the bottom slightly bigger and spoon or pipe the mixture into the base of each roll. Fill as many rolls as you would like to serve.
Place rolls on a serving plate and top with warm chocolate sauce.
ease: 8.5/10. A few elements but nothing too challenging. total prep time: 45 minutes + cooling time
total cooking time: 30 minutes total: 1 hours 15 minutes + cooling time
taste: 10/10 I know these are not “the real thing” but oh my goodness they are pretty special. I hope you enjoy these as much as our house did.
would I make it again: For special occasions, absolutely. I couldn’t make them more often as they would disappear too quickly.
I have been trying to make any sort of Paleoish meringue/pavlova for a few weeks now. I think I have used at least three dozen egg whites (and made LOTS of mayonnaise with the yolks) and I finally think I’ve cracked it.
Although these aren’t as thick as a normal pav, they have that crunchy exterior and soft gooey interior. When I was making them it felt like I was making real meringue. I was sooooo excited.
So before anyone judges me, I know the Paleo lifestyle is not about making sweet things compliant enough to eat and I actually don’t eat many sweet things at all, it was more the challenge of being able to make this so that it was similar to what used to do. This recipe isn’t completely Paleo compliant because it uses Xylitol. If you want to try something else, this pavlova wreath recipe uses maple syrup.
If you give this a try I truly hope you enjoy it.
Meringue stack with strawberry sauce (recipe by Fiona at Food 4 Thought).
No: Gluten / Grain / Soy / Nuts
Contains: Eggs / Dairy (optional)
Makes 2 x 20cm discs.
You will need
Oven
Spatula
Butterfly whisk
2 x baking tray lined with non-stick paper
20cm ring to mark a pattern on the paper
Cooling rack
Meringue Ingredients
150g xylitol (from Birch trees)
200g egg white (approx. 6 eggs)
1 pinch cream of tartar
1 teaspoon lemon juice
2 teaspoons honey
3 teaspoons tapioca flour (see Tips for LCHF option)
Preparation
Preheat oven to 120°C. Line 2 large baking trays (40 x 35 cm) with baking paper. Trace 2 circles (approx. 20 cm) on the underside of each piece of baking paper, then set baking trays aside.
Place xylitol into mixing bowl and mill 15 seconds / Speed 9. Transfer into a bowl and set aside. Thoroughly clean and dry mixing bowl.
Insert butterfly whisk. Place egg whites and cream of tartar into mixing bowl and whip for 3 minutes / 50°C / Speed 4 / MC off.
With butterfly whisk still in place, mix 3 minutes / Speed 4 / MC off, slowly adding reserved xylitol through hole in mixing bowl lid 1 spoon at a time until well combined.
Mix the lemon juice and honey together in a small bowl until combined. With butterfly whisk still in place, mix 1 ½ minutes / Speed 4 / MC off, adding lemon/honey, then tapioca flour through hole in mixing bowl lid until combined.
Spoon mixture into traced circle guides to form discs approx. 2-3 cm thick. Bake for 1 ½ hours (120°C).
*While Meringue are baking, make Strawberry sauce if you like.
Turn oven off and leave meringue discs to cool completely in the oven with the oven door slightly open (with a wooden spoon or similar to hold it in place), leave approx. 3 hours or overnight. Clean and dry mixing bowl and butterfly whisk. Once cooked, remove from oven and place onto cooling rack, leave for a few hours to dry out as much as possible (I left mine uncovered for another day).
Strawberry sauce Ingredients
250g fresh strawberries, washed and green tops removed
3 teaspoons honey (or 40g xylitol)
2 teaspoons lemon juice
Preparation
Place all ingredients into mixing bowl. Cook for 3 minutes / 90°C / Speed 3. Then mix for 10 seconds / Speed 5. Transfer into a bowl and set aside. Thoroughly clean and dry mixing bowl. See below regarding assembly.
ASSEMBLY –
To serve
– Cream/Coconut cream – I would use approx. 500g of cream to top these discs. For whipped coconut cream, use 2 cans chilled overnight and follow a whipped coconut cream recipe for instructions.
– Fresh berries or fruit of choice
To assemble meringue stack, place 1 of the discs onto a serving platter. Top disc with half of the whipped cream of choice, then decorate with fresh mixed berries and drizzle with 1-2 tablespoons of the strawberry sauce. Place remaining meringue disc on top, then repeat layering with remaining cream, fresh berries and 1-2 tablespoons of the coulis. Serve immediately.
My tips
*Before I start this recipe, I do a lemon or vinegar wash on my bowl. This video explains how and why you should do so.
*It is important that you start this recipe at least a day before you want to assemble it so that the discs have time to dry out properly.
*Use any fruit toppings that you like.
*This is best eaten on the day of assembly.
*For LCHF – You could substitute the tapioca flour for xantham gum. I would try ½ – 1 teaspoon. I haven’t tried this so can’t guarantee it will work.
ease: 7.5/10. Just a few steps. prep time: 50 minutes + cooling time
cooking time: 1 hour 30 minutes total: 2 hours 20 minutes + cooling time
taste: 9/10 Not quite as good as I remember the “real thing” but a great dish in its own right.
would I make it again: For special occasions, absolutlely.
Lamb has always been one of my favourite sources of protein. In fact it was the first meat I ate when I broke out of my 15 years of vegetarianism!
For as long as I can remember it ahs almost been traditional to have some form of lamb as part of Australia day celebrations. This year I wanted something simple, that I could make ahead and not worry about while I had guests. So these little burgers are the perfect solution. Easy to make, make them the day before, loaded with flavour and served with your favourite burger bun, what could be better? My suggestion is to make up several batches of these and pop them in the freezer so you have them on hand, they are already a staple in our repertoire. If your house is anything like mine when you have guests for a BBQ, the men cook the BBQ and ladies generally do salad (and everything else!) These can be cooked on the BBQ, salad and cauliflower rolls can be made earlier, which means you get to sit with a cool drink and chat. I hope you enjoy it all!
(paleo/LCHF) Spiced lamb burgers (recipe by Fiona at Food 4 Thought).
No: Gluten / Grain / Dairy / Soy / Nuts
Contains: Eggs
Makes 6 burgers.
You will need
Frying pan/BBQ/Oven
Spatula
Egg flip or similar
Dinner plate
Coconut oil, ghee or lard for shallow frying
Cooling rack
Ingredients
1 clove garlic, peeled
150g brown onion, chopped into pieces
100g carrot, chopped into pieces
20g (1 Tablespoon) coconut/olive oil
1 teaspoon ground cumin
1 teaspoon ground coriander
½ – 1 teaspoon dried chilli flakes
300g lamb rump steak, trimmed of fat and sinew, cut into 3-4cm chunks OR 300g minced lamb
1 tablespoon vegetable stock concentrate OR 1 teaspoon finely ground salt
1 egg
To serve – toppings pf your choice.
Place garlic into mixing bowl and chop for 5 – 10 seconds / Speed 6. Add onion and carrots and chop for 5 seconds / Speed 5. Scrape around sides of mixing bowl, add olive oil and cook for 5 minutes / 100°C / Soft speed / MC off. Add cumin, coriander and chilli flakes, cook 2 minutes / 100°C / Soft speed / MC off. Pour mixture onto a dinner plate and spread out thinly, set aside to cool.
If you are using minced lamb skip this step. Without rinsing mixing bowl, add chunks of rump and mince on for 2 – 5 seconds / Reverse / Speed 7.
Add cooled vegetable mixture, stock and egg. Mix for 30 seconds / Reverse / Speed 4. You should have a paste consistency. If not, mix for longer as this is what will help hold the burgers together during cooking. Remove mixture from bowl and set aside.
If cooking immediately, place a large frypan over medium heat OR BBQ hot plate OR pre-heat oven to 180°C. Moisten hands with cold water and divide mixture into six equal portions. Shape into burger patties, cook immediately OR place on a lined tray, cover and refrigerate until required. See tips for freezing.
For frypan or BBQ, I cooked these for 2-3 minutes per side. I baked them in the oven for 20 minutes.
Serve with toppings of your choice. If you have any left over, store in an air tight container in the fridge for 3-4 days or freeze.
DOUBLING THIS RECIPE: You can double this recipe easily. You may need to assist the final mixing step by using the spatula through the hole in the mixing bowl lid to make sure you get the right consistency before shaping the burgers.
My tips
* These burgers are very moist because they have no flour or breadcrumbs added to them. You need to make sure you have a paste consistency after you have mixed everything together before shaping them. This helps them hold together during cooking.
* I chop my meat on reverse because I like the texture I end up with.
* Change the flavour by substituting other herbs and spices to the mix. Ras el hanout or garam marsala would be lovely. Make it your own.
* Shaping – I made these slightly larger than the buns as they will shrink slightly during the cooking process.
* If you are not using these immediately, once shaped place on a lined baking tray and freeze them. Then place non-stick paper in between the burgers, stack and freeze for as long as your freezer instructs.
* You could substitute the lamb with beef or chicken if preferred.
* To reheat these I used an air fryer. 180°C for 4 minutes was perfect.
* Add any burger toppings that you like.
ease: 9/10. Just a little bit of shaping required. prep time: 15 minutes
cooking time: 20 minutes total: 35 minutes
taste: 10/10 These are great. No fillers, no extras, just pure flavour. Yum, yum, yum.
would I make it again: They are already a staple, especially in summer.
I’ve never been a big bread eater. I remember as a child the only thing I really liked was plain white bread with vegemite and grated cheese and even that was only when I was quite young. As I grew older and my palate developed it wasn’t something I gravitated to. So following a paleo lifestyle didn’t really present me with a “no bread” challenge. However, when I want to have a burger, I like to pick it up and feel like I’m eating a burger.
I have always loved cauliflower and more recently I feel that I have become somewhat obsessed. I want to try it as many ways as I can and I’m starting to realise just how versatile this inconspicuous little vegetable is.
These are something that I’ve wanted to “play with” for a little while now. You can use the recipe (minus the garlic and rosemary) as a base and create your own flavours. Add your favourite burger and enjoy.
(paleo/LCHF) Cauliflower buns/rolls (recipe by Fiona at Food 4 Thought).
No: Gluten / Grain / Dairy / Soy / Nuts
Contains: Eggs
Makes 6-8 complete buns/rolls.
You will need
Oven
Spatula
Egg flip or similar
Glass bowl
2 x baking tray lined with non-stick paper
9-10cm round cookie cutter or similar
Cooling rack
Ingredients
1 sprig (approx. 20cm in length) fresh rosemary, leaves only OR 1 tsp dried rosemary
1 clove garlic, peeled
400g cauliflower florets, chopped into bite-sized pieces
½ teaspoon fine salt
2 Tablespoons (30g) coconut flour
2 eggs
1 ½ – 2 Tablespoons nutritional yeast flakes (optional)
Poppy/sesame seeds, to sprinkle on top (optional)
Preparation
Pre-heat oven to 180°C and prepare baking trays.
Place rosemary leaves into mixing bowl and mill for 1 minute / Speed 10 (If using dried rosemary, skip this step). Add garlic and chop for 5 seconds / Speed 6. Add cauliflower and chop for 4 – 6 seconds / Speed 5. This should be a rice texture.
Scrape around sides of mixing bowl, add remaining ingredients and mix for 20 seconds / Reverse / Speed 4. Scrape mixture into a separate bowl.
Place cookie cutter onto lined baking tray. Take approx. 80g (1/3 cup packed) of mixture and pour into cutter. Using hands or back of a spoon, press the mixture firmly into shape. Complete with remaining mixture. See tips for shaping. Sprinkle half with seeds if you wish.
Place buns in the oven and bake for 20 minutes, then turn over and bake for further 10 minutes or until golden and firm to touch.
*While buns are baking, make these burgers if you like.
Once cooked, remove from oven and place onto cooling rack, cool enough to handle and serve. To store, cool completely and store in an air tight container for up to 2 days.
When you want to use them, you can reheat them in a 180°C for 5 – 7 minutes or crisp them under the grill.
My tips *Substitute any other dried herb if you don’t have rosemary. *Shaping – Make sure the mixture is pressed in firmly. To make the “bun tops”, once pressed into shape remove cutter then gentle press edges down so they are slightly thinner than centre and have a tapered appearance. *Add any burger and toppings that you like. *We didn’t have any left over to check how they freeze but I think they would freeze quite well. *To reheat these I used an air fryer. 180°C for 4 minutes was perfect
*For LCHF – You could add a couple of tablespoons of cheese in place of the nutritional yeast and some ham if you like.
*Rosemary – I find when using fresh rosemary (and a small amount) just removed from the stem, it is difficult to cut in the Thermomix. I suggest you either take the leaves off the stalk and sit them on the bench uncovered overnight to dry out a little or put them on a lined tray and bake in oven for a few minutes to do the same.
ease: 9/10. Just a little bit of shaping required. prep time: 20 minutes
cooking time: 30 minutes total: 50 minutes
taste: 9.5/10 These are great. They stand up like a “normal” bun.
I have wanted to make a paleo “pavlova” wreath since I started this way of life many years ago. I think I can adapt many things to “become paleo” however I may have met my match……for now. Not that this recipe is a failure, it just isn’t as perfect as I would like, and here’s why. I want a crunchy exterior and soft interior that all melts in your mouth. After using 18 egg whites and trying different combinations of heated eggs, heated maple syrup, cold of both, coconut sugar ground or not (you get the idea), I finally had something that I am happy enough to share. It has a soft marshmallow texture that melts in your mouth and begs you to take another bite.
I learnt A LOT during this process and can’t wait to resurrect this recipe and make it even better. I hope you enjoy this version. Whether it is a last minute gift idea or for your own pleasure, you should try these.
(paleo) pavlova wreath– serves 6-8 (recipe by Fiona at Food 4 Thought).
Ingredients
5 – 6 egg whites (approx. 180 – 200g in total)*
pinch salt
125g pure maple syrup
1 tablespoon tapioca flour
1 teaspoon vanilla extract or paste
1 teaspoon lemon juice
Preparation
Preheat the oven to 150°C (fan-forced). Line a baking tray with non-stick paper. Turn the paper upside down and use a plate or bowl to trace around to create a circle, then use a smaller plate or bowl to trace in the centre. I used 24cm diameter for my larger circle and 14cm diameter for the smaller one. This will give you a ring shape that will allow you to create your shape. Turn the paper over so that the tracing is underneath the paper, that way your ingredients won’t touch it.
Before starting this recipe I recommend you do a vinegar wash on your bowl and butterfly. I place the butterfly whisk into position in the mixing bowl, add 1200g of boiling water from my kettle along with 200g of white vinegar (the cheapest you can find) and heat for 6 min / 90°C / speed 1. Carefully remove the butterfly, empty contents of the bowl, dry everything thoroughly, replace mixing bowl into position and use the turbo function for 1 – 2 seconds to remove any excess water from under the blade. This will ensure the bowl is as clean as possible. Dry mixing again and get ready to start.
Insert butterfly into mixing bowl and leave MC off. Place a jug or bowl on top of the lid and measure the maple syrup. Set this aside. Place egg whites and salt into mixing bowl and whisk for 3 – 5 min / speed 3 until egg whites become stiff. Keep an eye on them and don’t over whip them. Scrape the sides of the mixing bowl with the spatula.
Set the machine for 3 min / speed 3 and slowly pour the maple syrup through the hole in the mixing bowl lid. This should take a minute or so. Then add the tapioca flour a teaspoon at a time, then vanilla and lemon juice. Continue mixing until time runs out.
Remove the butterfly whisk from the bowl and set aside. Remove stiffened egg mixture from bowl and shape into a ring on the paper. Smooth out if you like or leave it a little rough. If there is excess mixture on the butterfly, once the mixture has been removed from the mixing bowl, place the butterfly whisk into position and mix for 5 sec / speed 4. This should spray everything off the blade and allow you to scrape it from the mixing bowl.
Once shape is complete, place into oven and immediately turn oven down to 110°C (fan-forced), bake for 45 – 55 mins, until golden brown. Once cooked, allow to cool slowly in the oven with door propped slightly open (use wooden spoon).
Leave overnight before decorating with whipped coconut cream and fruit of your choice.
Add your favorite toppings!
My tips: *I found it didn’t matter what temperature the egg whites were at. If they were at room temperature they whipped up quicker, however if they were cold I whisked them longer and got the same result. *The cooking time will depend on your oven. My oven tends to cook quite hot. If you know your oven is a little cooler then cook it at 120°C and keep an eye on it. You will find this will go quite golden because we used maple syrup.
ease: 7/10. Egg whites can be like computers, they tend to have a mind of their own and you can never explain why it works one day and not the next. prep time: 10 minutes
cooking time: 50 minutes total: 60 minutes + cooling time
taste: 8/10 The flavour of this is delicious, i8t is just the texture that I would like to try and improve on.
would I make it again: Yes, for special occasions….and to try it again 🙂
Shortbread is one of the treats I enjoy and following a paleo lifestyle doesn’t mean I miss out. I love the rich buttery taste and the slightly crumbly texture that almost melted in your mouth yet still had a little crunch. That is exactly what I wanted from this recipe and I think I’ve got there. After a few trials that I had to taste test (the hardest job of all) I hope you enjoy this recipe.
Whether it is a last minute gift idea or for your own pleasure, you should try these.
(paleo) Cranberry and pistachio shortbread– makes approx. 24 (recipe by Fiona at Food 4 Thought).
Ingredients
50g pistachio
220g blanched almonds, raw or activated if you like (see notes below) or use 220g almond meal
60g coconut oil, melted
40g maple syrup or honey
30g coconut sugar
30g tapioca flour
20g coconut flour
seeds from ½ vanilla pod or 1 teaspoon vanilla extract or paste
2 pinches ground rock or pink salt
25g unsweetened dried cranberries
Preparation
Line 2 x baking trays with non-stick paper. Preheat the oven to 170°C (160°C fan-forced).
Place pistachio nuts into mixing bowl and chop for 3 sec /speed 5, remove from bowl and set aside.
Place almonds into mixing bowl and chop for 10 sec /speed 8, to make them into almond meal. Scrape around sides of mixing bowl with spatula. If coconut oil isn’t melted, remove almond meal from bowl and set aside.
If coconut oil is melted, skip this next step. Add coconut oil to mixing bowl and heat for 2 min / 90°C / speed 1 or until melted.
Add remaining ingredients (including pistachios) to mixing bowl and mix for 15 sec / speed 3 or until combined. Layout a 40cm piece of cling wrap and scrape mixture into centre. Flatten until mixture is approx. 2cm thick, wrap and place in freezer for 10 minutes.
Once chilled slightly, remove mixture from freezer and divide in half. Rewrap one half and place in the fridge. For the other half, layout a 40cm piece of baking paper and place an extra 40cm piece of cling wrap (or baking paper) on top. Place the mixture in between the paper and cling. Use a rolling pin to roll out to 8-10mm thick. Cut out desired shapes and place onto lined tray. Press the off cuts or mixture together, wrap in cling and place in fridge while rolling out the second half of the dough. Remove second half of dough from the fridge and place between paper and cling and repeat rolling and cutting out process. Combine all off cuts of mixture and repeat rolling and cutting out process until all dough is used.
Once shortbread are on trays, place into freezer for 10 minutes (*If you don’t have time to do this see my tips below). Once chilled, place into pre-heated oven and bake for 12 – 15 mins (depending on your oven) or until golden. Once baked, remove from oven and cool for 15 minutes on tray then transfer to a wire rack to cool completely.
Store in an airtight container in fridge for two weeks or freeze for up to 6 months. Give these as a gift or serve to guests.
My tips: *If you feel the off cuts are becoming too difficult to work with, wrap in cling and place in freezer for 5-10 minutes to chill then continue. *I used a 6cm diameter round cutter for my shortbread but anything will work. *If you don’t have time to place the cut out shortbread in the freezer before cooking, you can place them straight into the oven and cook them for 8-10 minutes. They will spread a little more and will have a slightly chewy texture but they are still delicious. *You can also substitute the coconut sugar with extra maple syrup. You might find the texture is not as crumbly. *During cooler months coconut oil will solidify. The easiest way to melt it is to loosen the lid of the jar slightly then run the sides of the jar under hot water. It will melt quite quickly. *I activate nuts by soaking them for around 5 hours and rinsing them. You can use them straight away If you want them crunchy again, roast them (low and slow) in the oven. This process decreases levels of anti-nutrients such as phytic acid. You can find some more information here and lots of other places on the net.
ease: 8.5/10. This is as easy as any other shortbread I’ve made. prep time: 40 minutes (including chilling time)
cooking time: 15 minutes total: 55 minutes + cooling time
taste: 9/10 The feedback I got for these was wonderful. One of my friends even wanted to buy some to give as a gift
would I make it again: Absolutely. Especially if I need a quick treat to share with friends.
One of the things I love to do most in life is to bake. When I was (much) younger I used to sit on the bench and help my Mum cream together butter and sugar for the beginning of a cake – by hand of course – mixing it in the bowl with a wooden spoon. I’m sure the butter would have been made by hand churning the cream (from the family cows) until it split into that gorgeous sunshine yellow and that silky buttermilk. As I reflect on those times I can’t help but think how idyllic that was!
While a few things have changed (I’m too big to sit on the bench, I have found some wonderful healthy and tasty substitutes for butter and sugar, I use a Thermomix to make my own butter ), one thing remains the same. I still love to bake. It brings me a sense of relaxation, of joy and a feeling that I’m sharing a piece of my soul to those who taste my creations. I don’t eat desserts or cake that often anymore but when I do it has to be good, otherwise, what’s the point!
I like this recipe because the cake isn’t too sweet, it is firm enough that you could use it as a celebration cake and decorate it quite easily and it keeps really well. You can put the icing on at least a day ahead of when it is needed, pop it in an air tight container and leave it in the refrigerator. It can be for Easter or anytime of the year. I hope you enjoy this recipe too.
(paleo) Carrot cake and cashew cream frosting – makes 2 x 19cm cakes (recipe by Fiona at Food 4 Thought).
Ingredients cake
200g whole almonds (skin on), raw or activated if you like (see notes below) or use 200g almond meal
200g carrots (skin on), washed and chopped into 2cm pieces 0r use the same amount of finely grated carrot
20g (2 Tbls) coconut flour
1 teaspoon ground mixed spice
1 ½ teaspoons ground cinnamon
2 pinches ground rock or pink Himalayan salt
50g coconut oil, melted
4 eggs
100g raw honey or maple syrup
seeds from ½ vanilla pod or 1 teaspoon vanilla extract or paste
1 teaspoon bicarb soda (baking soda)
60g raisins
2 teaspoons fresh lemon juice
frosting
150g raw cashews, raw or activated if you like (see notes below)
60g honey or maple syrup
3 teaspoons fresh lemon juice
50g filtered water (you may need less if you have activated the nuts)
40g coconut oil, melted
seeds from ½ vanilla pod or 1 teaspoon vanilla extract or paste
1 pinch ground rock or pink Himalayan salt
Preparation
Line 2 x 19cm round cake tins with non-stick paper. Preheat the oven to 180°C (170°C fan-forced).
For cake, place almonds into TM bowl and chop for 10 seconds on speed 8, to turn them into almond meal. Scrape around sides of mixing bowl with spatula. Add carrots and chop for 3-4 seconds on speed 6 or until chopped finely. Add remaining ingredients and mix for 15 seconds on reverse, speed 3 or until combined. Pour into prepared tins and level with a spatula.
Bake for 20 – 25 mins (depending on your oven) or until a skewer inserted into the centre of the cake comes out clean. Once baked, remove from tin and cool completely on wire rack before frosting.
For frosting, place cashew nuts into TM bowl chop for 10 seconds on speed 8. Scrape around sides of mixing bowl with spatula. Add all remaining ingredients into TM bowl and mix for 20 – 30 seconds on speed 4 or until well combined and smooth. Scrape around the sides of the bowl and repeat if necessary. Pour frosting over each cake, assemble as you like and place into fridge until needed.
Decorate with whatever you like.
My tips: *You could make this in one 22cm cake tin then cut it once it is has cooked and cooled however it will be a little denser. You would need to cook it for 45 – 55 minutes depending on your oven. *You can add a handful of walnut pieces to this batter if you like. *If you don’t have raisins you can substitute sultanas. *During winter coconut oil will solidify. The easiest way to melt it is to loosen the lid of the jar slightly then run the sides of the jar under hot water. It will melt quite quickly. *I activate nuts by soaking them for around 5 hours and rinsing them. You can use them straight away If you want them crunchy again, roast them (low and slow) in the oven. This process decreases levels of anti-nutrients such as phytic acid. You can find some more information here and lots of other places on the net.
ease: 8.5/10. This is as easy as any other cake I’ve made. prep time: 10 minutes
cooking time: 25 minutes total: 35 minutes + cooling time and assembly
taste: 9/10 This was (it went pretty quickly) delicious. Even my non-paleo friends decided this was “pretty good” for a healthy cake (and they went back for seconds).
would I make it again: Absolutely. Especially if I need a cake to decorate for a special occasion.
The weather has finally warmed up a little in Perth. For me, that means my eating habits change. I want to eat lighter, brighter food. So it is almost time to say goodbye to my curries and wintery stews and hello to more salads, shakes and ice creams. It also means the opportunity for more alfresco dining, BBQ’s and picnics.
One thing that never changes though is that I LOVE a good condiment. With a curry I like mango chutney, tamarind sauce or my all time favourite, eggplant kasundi. With a roast it has to be good gravy. I also add sauerkraut on the side of many of my dishes because of the medicinal benefits.
So what do I want to accompany those summery dishes, like salad, sandwiches or even the base of a tart? One of my absolute favourites is caramelised onion jam. There is something about onions that have been cooked until they have converted their juices to sweet nectar and have that stickiness that makes you want to eat more. The only problem is that this process is normally assisted by using some form of sugar, something I don’t eat any more.
So if I wanted some of my favourite little side dish, I needed to come up with something that would work with my lifestyle.
This recipe is super simple and as I mentioned, extremely versatile. One of the things that will be on my list of things to create very soon is a Paleo caramelised onion tart. YUM! I’ve used this jam in my Roast Beef Gravy and my Perfect Paleo Pies. You can use it with BBQ meats, or even with a baguette and some aged cheddar cheese. Even give it as a gift. Whatever you like.
I really hope you enjoy the results of this recipe as much as I do.
(healthy) caramelised onion jam (recipe by Fiona at Food 4 Thought). Makes approx. 2 cups.
Ingredients
½ red apple (approx. 100g), cut into pieces
600g onions (red or brown), cut into pieces
20g coconut oil, ghee or butter
20g olive oil
50g apple cider vinegar
20g coconut amino or 1 tablespoon vegetable stock paste
80 – 100g honey (raw or cold pressed)
Preparation
Place apple pieces into TM bowl and chop for 5 seconds on speed 5. Scrape around the sides of the bowl. Add onion pieces and chop for 4 seconds on speed 6. Add coconut oil/ghee/butter and olive oil. Cook for 20 minutes at Varoma temperature on reverse, speed 2 with the MC off. If the mixture starts to splatter place the simmering basket onto the mixing bowl lid. (I didn’t need to do this but just in case).
Add the remaining ingredients and cook for a further 5 minutes at Varoma temperature on reverse, speed 1 with the MC off. Scrape the base of the mixing bowl well to ensure mixture isn’t sticking. Cook for a further 5 minutes at Varoma temperature on reverse, speed 1 with the MC off. Mixture should be softened and darker in colour.
Store in sterilised jars in fridge until needed.
My tips: *This is great with roast beef, steak sandwiches, salads, in gravy and in tarts. Add it to cream cheese or cashew cheese to make an easy onion dip. *Make jars of it for gifts. If you would like to double the mixture, make sure you add at least 20 minutes to the cooking time. *This will keep for approx. 3-4 weeks in the fridge.
In my humble opinion, society today feels like a world of convenience. I know this is rather a serious statement for the start my post with but I really feel this dictates many of our daily choices. We all want things faster, easier and with less effort on our own behalf. I’m very guilty of this as time seems to be my most precious commodity.
Certain things seem to be more commonplace such as welling at my computer if it is not going fast enough, not ironing clothes that clearly need it and even skipping a meal or two just through not having enough time. Now that I say them out loud they all seem rather stupid but shortcuts do start to creep in everywhere.
However, there is one thing I will not compromise on – the food I eat. I don’t buy premade meals and do cook as much from scratch as I possibly can. I’ve learnt over many years that it is important to fuel your body with the right things to get the best out of it. When it comes to eating, I tend to be a “snacker”, eating smaller amounts more often throughout the day rather than bigger meals. My friends often say “you’re always eating”, and I guess it seems like I am. So having things on hand that I can grab on the run that keep my energy up is really important.
The great thing about making your own food from scratch is you can choose exactly what goes into it and what flavours you want. The challenging part is that it can be time consuming to “make your own”. Luckily this is where a Thermomix can come in very handy.
When I developed these recipes I knew they had to be really quick and easy as well as packed with flavour and nutrition. Oh and at least one on them had to replicate my favourite flavour, salted caramel. You can use these as a base and change the ingredients to suit you. I know there are possibly thousands of bliss ball recipes, so I hope you enjoy these.
(paleo) “salted caramel” bliss balls (recipe by Fiona at Food 4 Thought). Serves 20 – 24 pieces, depending on size.
Ingredients
30g unsweetened flaked or shredded coconut
200g pitted medjool dates (about 12)
150g raw or activated nuts (I did half cashews and half pecan) *see below for nut free version
½ teaspoon fine sea salt or pink Himalayan salt
2 teaspoon vanilla paste or extract
Preparation
Place all ingredients into TM bowl mix for 30 seconds on speed 8. Scrape around the sides of the bowl, checking that ingredients are well combined. If needed, repeat for further 15 seconds on speed 8. Press some of the mixture together to make sure it will stay in a ball. If needed do a further 15 seconds. Place mixture into separate bowl and refrigerate (see tips below), this will make it easier to roll into balls. Once slightly chilled, take a rounded teaspoon/level tablespoon of the mixture and roll into balls. Place on a lined tray and refrigerate until firm (a couple of hours). Store in an air tight container in the fridge until ready to eat.
My tips: *To make these nut free simply substitute the nuts with sesame or sunflower seeds. *I found putting the mixture into the fridge to chill a little made them MUCH easier to roll into balls. If you don’t have time to do that just press them into a tray and cut them into cubes. You can also put it into the freezer for 10 minutes to firm the mixture slightly *If you are lucky enough not to eat these in the first two days, these will keep for approx. 2 weeks in the fridge.
ease: 9.5/10. Does it get any easier?!? prep time: 10 minutes + chilling time
cooking time: 0 minutes total: 20 minutes + chilling time
taste: 9.5/10 I’ve made a LOT of bliss balls. These got two thumbs up from G and are my absolute, all time favourite.
would I make it again: Ummm, I’ve already made three! hehehe.
(paleo) “chocolate chia” bliss balls (recipe from a friend and adapted by Fiona at Food 4 Thought). Serves 20 – 24 pieces, depending on size.
Ingredients
30g unsweetened flaked or shredded coconut
150g pitted medjool dates (about 10)
300g raw or activated nuts (I used almonds)
¼ teaspoon fine sea salt or pink Himalayan salt
60-80g raw honey
20g (2 tablespoons) raw cacao powder
30g (2 tablespoons) chia seeds
30g (2 tablespoons) melted coconut oil *see below for melting easily
34g (2 tablespoons) water
Preparation
Place all ingredients into TM bowl mix for 45 seconds to 1 minute on speed 8, until the mixture forms a ball or sticks together well. Scrape around the sides of the bowl, checking that ingredients are well combined. Moisten your hands with cold water and roll into balls. Place on a lined tray and refrigerate until firm (a couple of hours). Store in an air tight container in the fridge until ready to eat.
My tips: *If you are struggling to roll these into balls you might want to try the fridge idea mentioned above. *Substitute the nuts for any others and add some extra dried fruit (like dried cranberries) to switch it up a little. *To melt coconut oil easily I simply place very hot water into a container so that it will come at least halfway up the jar, slightly loosen the lid and sit the container in the water. Make sure that no water can get into the jar. I do this just before preparing all the other ingredients. This allows time for it to soften before it is needed.
Easter time is one of those joyous occasions when many of us catch up with family and friends. Good food, company and a beverage or two.
There also tends to be LOTS of chocolate in one form or another. Easter hunts are still as popular as ever with more and more varieties of shiny wrapped goodies on the supermarket shelf every year.
In years past I would have indulged a little (or a lot) in some of those rich, sweet and tempting treats. These days, due to health reasons and a complete change in my eating plan, chocolate is not something I indulge in often at all. Although, there have been 90% cocoa blocks floating around the house that have been nibbled by moi.
So you can see that if I have chocolate, I’m quite particular about what it is made of. This recipe is simple, healthy, quick and can be changed to take on any flavour you like. I actually converted it for a competition (which I didn’t end up entering because I ran out of time – the story of my life!). The competition was run by doTERRA and was about using their essential oils in raw desserts. I started using doTERRA essential oils as part of the healing program for my auto-immune issues. I found them so AMAZING that I became a Wellness Advocate and now love sharing the oils with anyone who is interested. You can find out more about the oils and how they work through this link.
Nonetheless, with or without the addition of oils this is something that you can make at the very last minute and anyone can eat as much as they like. No limiting the Easter chocolate when it is this good for you!
No matter what you are eating over the Easter break, I hope you are sharing it with people you love and creating some beautiful memories.
(paleo) faux “white chocolate” (recipe converted by Fiona at Food 4 Thought inspired by The Rawtarian.). Serves 20 – 30 pieces, depending on size.
Ingredients
250g shredded coconut
75g maple syrup (or any other sweetener that you like) 1/8 teaspoon sea salt
1 teaspoon vanilla paste or extract (leave this out if using oils) Optional
5 – 6 drops of doTERRA oil of your choice – lemon, peppermint, cinnamon, wild orange, lime or even lavender
Preparation
Place coconut into TM bowl and mix for 1 ½ minutes on speed 8. Scrape around the sides of the bowl and repeat if necessary, but only until mixture looks like it is starting to come together a little. When it gets to this stage, add remaining ingredients and mix for 1 minute on speed 6. Mixture should hold together when squeezed in your hand and should feel “wet”.
Press mixture into mould or tray firmly and freeze 30 minutes. Once set, pop out of moulds and keep in an airtight container in freezer until required.
My tips: *Make sure that you process this enough in the beginning. It should just start to stick together after the first process. *The mixture must be pressed into the moulds or tray FIRMLY or it will just crumble. *I use doTERRA oils because of their purity. You can use whatever you prefer but I would suggest something that is therapeutic grade.
ease: 9/10. So simple for such a great result! prep time: 15 minutes + setting time
cooking time: 0 minutes total: 45 minutes
taste: 9/10 I LOVE this. I feel like I’m being so naughty but I’m really not.
would I make it again: Yes, and next I’m trying a chocolate version!
Hellllllloooooo!!!!! It is so long since I have posted on my website, looked at a new recipe or even spoken to you all that I feel like I almost need to reintroduce myself.
For those who are new to my blog, my sincere welcome, I hope you find it interesting. For those who are dedicated readers, my heartfelt gratitude for inspiring me to continue doing what I do.
You may have seen a little “shift” in my recipes lately to a paleo style of eating. This has been due to some serious health issues that I was trying to resolve with the assistance of my gorgeous and fabulous Naturopath (if you want her name just let me know) and through changing my diet. I’m really pleased to say that we have made some significant progress and I am feeling so much better.
It doesn’t mean that you have to follow the paleo way of eating to enjoy my recipes, it just means that you will enjoy the food and it will be good for you.
This is a recipe that I adapted to the Thermomix. It is something that has been a part of my repertoire for many years and if I ever make it for friends there are lots of positive comments. There are a few ingredients but don’t get scared, just keep reading. In the hint and tips I will make sure that I tell you how and where I buy my ingredients.
Now I know it is the middle of summer (at least in Perth) so not necessarily curry season but I’ve always been a bit strange like that. I love eating hot things in hot weather and cold things in cold weather. So summer = curry and winter = ice cream. Weird, right :). No matter when you make this I hope you enjoy it. It is definitely a favourite in our house. Oh, and like many curries, the leftovers are even better :).
(paleo) Pork & eggplant curry (recipe by Fiona at Food 4 Thought).
Serves 4-6
Ingredients paste
4 garlic cloves
100g red onion/shallot
50g fresh or frozen lemongrass, chopped into 1cm pieces
zest of 1 lime, peeled with a peeler, reserve lime flesh
20g fresh or frozen coriander root (about 8-10)
½ teaspoon shrimp paste
1 fresh or frozen kaffir lime leaf
1 teaspoon paprika
½ teaspoon ground turmeric
1 teaspoon cumin seeds or ½ teaspoon ground cumin
½ teaspoon dried chilli flakes
20g olive oil
100g water
curry
400 – 500g pork loin, cut into 3cm pieces
300g eggplant, cut into 2cm pieces
200g coconut milk
20-30g fish sauce
20-30g raw honey or coconut sugar
Preparation For paste, place all ingredients into TM mixing bowl and blend for 30 seconds on speed 7. Scrape around the sides of the bowl and repeat. Scrape around the sides of the bowl and cook for 5 minutes at 100°C on speed 2. Scrape around the sides and base of the TM mixing bowl. Store paste for another time or leave it in the bowl and use it immediately.
For curry, place pre-made paste into TM mixing bowl and add pork pieces. Cook for 3 minutes at 100°C on reverse, speed soft. Add eggplant and coconut milk. Cook for 50 minutes at 90°C on reverse, speed soft. Add fish sauce and coconut sugar then cook for another 10 minutes at 90°C on reverse, speed soft.
Squeeze over some juice from reserved lime and serve with cauliflower rice or side dish of your choice.
My tips: *The ingredients for the paste can be purchased from Asian food stores and some supermarkets. They are all quite common and easy to find. To make it easier, sometime I will buy pre-cut lemongrass that has been frozen, just use the same weight. *You can double or even triple this paste then just divide it up. Use what you need for this recipe then keep the rest in the fridge until you want to use it. You could also freeze it. *You can substitute chicken thigh for the pork and it is equally delicious. I would cook it for the same amount of time because you need the eggplant to soften. Chicken breast would not work in this dish.
ease: 7/10. Just a few steps in the preparation! prep time: 15 minutes + standing time
cooking time: 70 minutes (for curry only) total: 85 minutes + standing time
taste: 9/10 I LOVE the flavours in this curry. A delicious winter (or summer 🙂 ) warmer.
In January 2010, I said “Hello” to the blogging community and started my Food 4 Thought website. My goal was to put my passion for cooking into pages to share with others and hopefully along the way, inspire people to cook.
How things have changed! I still love to cook and to share my recipes. Inspiring people to try new things and take their own “food journey” continues to drive all that I do.
What has changed most? Since that first post, I now have a Thermomix (of course) and a digital SLR (camera) – I love them both. One allows me to create delicious food and the other beautiful photos :). I still have my KitchenAid because…….umm……it’s so pretty. Unfortunately it does gather dust because I tend to adapt things to “Hermie” now. I’ve taken my own food journey throughout the years and learnt that my body likes different foods now and runs more efficiently when I eat those particular things. Some people might think a breakfast of LOTS of spinach, avocado, roasted pumpkin and boiled eggs is a bit weird, but I love it.
As I mentioned, sharing recipes and ideas is really important to me and one of the reasons I write my blog and my newsletter. So when someone asked me recently how I use my Thermomix for breakfast aside from the “usual response” of poached eggs (YUM!), porridge, boiled eggs, CADA, omelettes, baked eggs and homemade bread and butter I also mentioned muesli bars.
When creating this recipe I took inspiration from a little cookbook that Thermomix in Australia offer. “Cooking for Me and You” is designed for one to two people and has some delicious recipes like Asian style mussels, Prawn stir fry and Chocolate custard soufflé. So in celebration of sharing to inspire people to cook, I am also sharing the book. Simply leave a comment below telling me about your favourite breakfast creation using the Thermomix. Share your recipes, you might inspire people xxx
(paleo) breakfast bar– makes approx. 18 bars (recipe by Fiona at Food 4 Thought inspired by Cooking for Me and You).
Ingredients
70g flaked coconut (unsweetened)
60g brazil nuts
120g your choice of mixed dried fruit
60g raw cashew nuts, activated if you wish
120g your choice of mixed seeds
250g almonds, activated and dried if you wish
3 eggs (or chia eggs)
60g raw honey
40g dried cranberries
Preparation
Preheat the oven to 170°C (160°C fan-forced). Line a 30cm x 20cm baking tray with non-stick paper.
Place flaked coconut into TM bowl and grind for 10 seconds on speed 7. Set aside.
Add brazil nuts and chop for 7 seconds on speed 4. Set aside with coconut.
Add cashew and dried fruit into TM bowl and chop on closed lid position, Turbo for 1 second, 1-2 times. Set aside with coconut.
Place almonds into TM bowl and mill for 8 seconds onspeed 8. Add eggs and honey, mix 5 seconds on speed 4. Add all other ingredients and mix for 20 seconds, reverse onspeed 3.
Scrape mixture into prepared tray, use damp hands to press down firmly and evenly. Bake for 25-30 minutes, until golden. Once cooked remove from oven and place on cooling rack. When just cool enough to handle, cut into bars. If you want to coat them in chocolate allow to cool a little more then coat as desired.
My tips: *For the dried fruit I used 30g apricots, 40g sultanas, 50g dates and for the mixed seeds I used 40g each of sesame, sunflower and pumpkin. You can use whatever you like. *I activated the nuts by soaking them then roasting them in the oven. This process decreases levels of anti-nutrients such as phytic acid. You can find some more information here and lots of other places on the net.
ease: 9/10. Not difficult, just a few steps prep time: 15 minutes
cooking time: 30 minutes total: 45 minutes
taste: 9/10 I LOVE these. They have become my “grab and run” breakfast as well as the little snack I have just to fill the gap when I need it. They’re not too crunchy so easy to eat one handed 🙂
Food journeys, diets, eating plans, lifestyle choices. These all evolve, grow and change, at times somewhat dramatically throughout our lives.
Food has been a big part of my life for as long as I can remember. My “journey” began as a youngster in the kitchen with my Mum. I remember helping to make sausage rolls for my Dad’s lunches and helping Mum mix the cakes, mainly so that I could lick the spoon.
As a teenager my Brother and I were State level competitive swimmers. We trained about four hours a day at least 5 days per week so keeping our bodies fuelled became really important. My grandparents had a farming property close by so most of our food came from the land. My Mum used to spoil us for dinner by making the best steak and kidney pie or lightly fried lambs fry (liver) with onion gravy. Delicious!
Ironically enough, in my later teenage years I announced to my family one day that I was strict vegetarian. This, combined with excessive sports activity, resulted in a dramatic (and unhealthy) weight loss and body obsession. This went on for too many years.
I am pleased to say that with years under my belt and lines on my face has come some wisdom. For quite a while I have eaten a healthy diet and exercised regularly. However I still enjoyed a sneaky dessert every now and then quite often. One of my favourites was my Mum’s cheesecake. It’s really good. So you can imagine how disappointed I was when my lifestyle needed to change again (due to health reasons) and I began eating a Paleo diet. I just had to make some form of lemon cheesecake. Although completely different to my Mum’s recipe, I love it just as much :). I hope you enjoy this simple recipe too.
(paleo) lemon cheesecake – makes one loaf tin (recipe by Fiona at Food 4 Thought inspired by Paleo Cupboard).
Ingredients base
200g whole almonds (skin on), activated if possible (see notes below)
6 medjool dates, pitted
30g coconut oil, melted
filling
200g raw cashews, soaked for at least 5 hours or overnight, drained
60g pure maple syrup
130g fresh lemon juice
100g coconut milk
60g coconut oil, melted
Preparation
Line a large baking tray with non-stick paper or a silicone mat.
For base, place almonds and dates into TM bowl and chop for 12 seconds on speed 8. Add coconut oil and mix for 20 seconds on speed 4 or until combined. Pour into prepared tray and press down firmly. Place in freezer while making the filling.
For filling, place all ingredients into TM bowl and mix for 1 minute on speed 7 or until well combined and smooth. Scrape around the sides of the bowl and repeat if necessary. Pour filling over the top of the base and place into fridge for at least 2 hours.
Serve with whipped coconut cream and lemon slices.
My tips: *During winter coconut oil will solidify. The easiest way to melt it is to loosen the lid of the jar slightly then run the sides of the jar under hot water. It will melt quite quickly. *I activated the nuts by soaking them then roasting them in the oven. This process decreases levels of anti-nutrients such as phytic acid. You can find some more information here and lots of other places on the net.
ease: 8.5/10. This is as easy as any other cheesecake I’ve made prep time: 15 minutes + chilling time
cooking time: 0 minutes total: 15 minutes + chilling time
taste: 9/10 This was (it went pretty quickly) delicious. Even G, who is not a big coconut fan, loved this. It had a strong lemon tang to it and the filling was silky. The base had the right cheesecake crunch.
would I make it again: Absolutely. And I want to try a chocolate berry version too 🙂
These days I hear more and more about people with food allergies or sensitivities and I’ve discovered that I’m one of those people.
Learning more about how my body reacts to certain foods has prompted me to ask questions like what am I doing that is contributing to this and how can I change it? Should I stop listening to “experts” and start listening to my body more? Is the food I eat nourishing me or making me ill?
All extremely valid and necessary questions I think. Many of my customers purchased a Thermomix so that they could go back to the basic style of cooking like their ancestors, void of preservatives, additives and colours. Others use it to combat allergens and avoid illness due to potential reactions. Originally, I decided I wanted a Thermomix in my kitchen because I loved cooking but was extremely time poor. However, three years on, I now use it in a completely different way than I first thought I would.
In recent years my eating habits have completely changed. This is primarily due to health reasons which I’ll share in future posts. My main challenge has been deciphering exactly what my body can and can’t handle in relation to food. The great thing is that I can make everything from scratch so I know exactly what is in everything I eat. This takes the “guesswork” out of my analysis and helps me pinpoint things quickly. Many of my clients want to KNOW what they are eating and the Thermomix is definitely a great tool for that. I sometimes say, “I used to think we ate healthy, now I know we do”.
Before I had to change my diet I LOVED to bake, and I still do. Now I just use slightly different ingredients. I still like the recipes to be simple and the results to be delicious! In the cooler weather I love nothing more than a cup of tea and a biscuit (thanks to my Nan) and it used to be a cup of Earl Grey with a dash of milk and am all butter shortbread. More recently it has become a cup of Green Tea and one of these delicious cookies. I hope you love this recipe.
(paleo) ginger cookies – makes approximately 20 cookies (recipe by Fiona at Food 4 Thought inspired by Detoxinista).
Ingredients
220g whole almonds (skin on)
½ teaspoon ground cinnamon
¼ teaspoon salt
¼ teaspoon bicarb (baking) soda
3 teaspoons ground ginger
50g pure maple syrup
20g water
15g blackstrap molasses
70 g (grass-fed) butter or ghee, soft
Preparation
Preheat the oven to 160°C (150°C fan-forced). Line a large baking tray with non-stick paper or a silicone mat.
Place almonds into TM bowl and grind for 15 seconds on speed 8. Add all remaining ingredients to TM bowl and mix for 10 seconds at speed 3 or until combined.
Pour mixture into medium size bowl and place in freezer for 10 minutes or until slightly chilled. Remove mixture from freezer and roll into balls (or use a scoop – see tips below). Place them onto prepared tray, about 5 – 7 cm apart to allow room to spread. Bake for 15 – 20 minutes or until golden brown.
Once baked, allow to cool for a couple of minutes on the tray before carefully moving to a cooling rack.
Enjoy with or without a cup of tea.
My tips: *To divide the mixture evenly I used a mini ice cream scoop but spoons will work just as well. *You can substitute the butter/ghee with coconut oil if you like however the ratio might be slightly different. *This is a very versatile recipe. If you want it to be a cinnamon cookie, just leave out the ginger and increase the cinnamon to 2 teaspoons. If you’d like a spiced cookie substitute the ginger with 1 teaspoon of mixed spice.
ease: 9/10. Does it get any simpler?! prep time: 10 minutes + chilling time
cooking time: 20 minutes total: 30 minutes + chilling time
taste: 9/10 I LOVE these. I’ve made them twice since I created the recipe and ate 3 (or was it 4) in one day from the most recent batch.


 Lemon curd")
 Lemon curd")


